DAG Factory is an open source tool managed by Astronomer that allows you to dynamically generate Apache Airflow® dags from YAML. While Airflow dags are traditionally written exclusively in Python, DAG Factory makes it easy for people who don’t know Python to use Airflow. This guide provides a complete walkthrough of using DAG Factory package to build production-ready pipelines in a modern Airflow project. You will learn to install the library, structure your project according to best practices, and define a multi-task pipeline entirely in YAML. The example demonstrates powerful features like using the TaskFlow API, organizing tasks with task groups, and passing data between tasks, all from your configuration file. By the end, you’ll be ready to apply these patterns to your own dynamic dags. DAG Factory can be used with all Astronomer products and any Apache Airflow installation. To view the source code of the project, have a look at the dag-factory GitHub repository.Documentation Index
Fetch the complete documentation index at: https://astronomer-preview.mintlify.app/llms.txt
Use this file to discover all available pages before exploring further.
When to Use DAG Factory
While writing dags directly in Python is powerful and flexible, it’s not always the most efficient approach for every use case. DAG Factory offers a configuration-driven alternative where you define the structure of your pipelines in YAML. This is particularly useful in several key scenarios:Empowering Teams
YAML is often more approachable than Python. DAG Factory allows team members like analysts or junior engineers, who may not be Airflow experts, to create and manage their own dags with a simplified, declarative syntax.
Standardizing Repetitive Dags
If you have dozens of dags that follow the same pattern (like a standard extract-and-load job), DAG Factory is ideal. You can create a standard template and then generate numerous dags just by changing the parameters in a YAML file, which reduces code duplication and simplifies maintenance.
Separating Logic from Structure
DAG Factory helps you separate the what from the how. The YAML clearly defines the dag’s structure and dependencies, while the underlying Python functions handle the actual business logic. This makes your dags easier to read at a glance and your Python code more modular and testable.
While DAG Factory is a flexible product that supports all the main concepts of Airflow, newer features like asset-aware scheduling may work but are not as user-friendly or as well integrated as others.
Assumed knowledge
To get the most out of this tutorial, you should have an understanding of:- The Airflow components and how they work together.
- Airflow fundamentals, such as writing dags and defining tasks.
- Basic understanding of Airflow operators.
Prerequisites
- Python 3.9.0+
- The Astro CLI
Step 1: Initialize your Airflow Project with the Astro CLI
First, create a new project directory and initialize an Astro project using the Astro CLI.init command creates a standard Airflow project structure. Since this tutorial focuses on DAG Factory, let’s remove the example dag that’s included by default.
dag-factory library as a project dependency. Open requirements.txt and add the following line:
dag-factory in the process.
http://localhost:8080 and you will be presented with an empty dags list.
Step 2: Organizing the project
A key to building a maintainable and performant Airflow project is proper organization. While you could put all your YAML configs, Python scripts, and SQL files into thedags/ folder, this can quickly become messy and put unnecessary strain on the dag processor.
For this tutorial, we’ll use a structure that is also a great starting point for real-world projects:
dags/: This folder will contain only the YAML configuration files and the Python script that generates the dags from them. This keeps all dag definitions encapsulated.include/: We will create ataskssubfolder here to hold the Python functions that our operators will call. Any other supporting scripts (e.g. SQL queries) would also live in sub-folders withininclude/.
tasks inside include. There, we’ll add Python scripts that define the functions our YAML-based pipelines will call in the next steps.
Step 3: Prepare functions
Our example dag will orchestrate a simple pipeline using both aPythonOperator using the TaskFlow API and a BashOperator using the traditional operator.
DAG Factory supports both traditional operators and the modern TaskFlow API. This tutorial targets Airflow 3.x and will use the TaskFlow API decorator syntax whenever possible.
include/tasks/ folder.
Create a file named include/tasks/basic_example_tasks.py with the following content:
Step 4: Define a basic dag in YAML
Now we can create the YAML definition for our dag. Create a new YAML file in thedags folder named basic_example.yml and add the following content:
+extract_data_from_a and +extract_data_from_b are used to pass the return value of the extract tasks to the store_data task, and how Jinja templating ({{ logical_date }}) is used to pass the logical date.
Step 5: Implement the generator script
The final step to make our dag appear, is to create the Python script that Airflow will parse. This script uses the DAG Factory library to find our YAML file and generate the actual Airflow dag object from it. This approach gives you full control over the generation process and allows for extensive customization in advanced use cases. Create a Python file nameddags/basic_example_dag_generation.py with the following content:
basic_example_dag will appear in the UI. It has 4 tasks in its pipeline, 2 of them within a task group:
extract_data: Uses the TaskFlow API to call the_extract_datafunction from ourinclude/tasks/basic_example_tasks.pyscript. We create 2 different tasks in this scenario. Both return a list of numbers.store_data: Uses the TaskFlow API to call the_store_datafunction from ourinclude/tasks/basic_example_tasks.pyscript. As you can see, to pass parameters with this approach, just set them with the appropriate name directly in the YAML configuration. With+extract_datawe tell DAG Factory to reference the return value of theextract_datatask. Also as shown in the example, you can use Jinja templating including variables, macros and filters.validate_data: Here, we use the classic approach to use theBashOperator, just printing the sentence data is valid.
The
load_yaml_dags function is responsible for generating the dags. You can point it to a specific file, or to a folder that it will scan recursively for .yml or .yaml files. It uses the provided globals_dict to add the generated dags to the Airflow context. For more options, see the official documentation.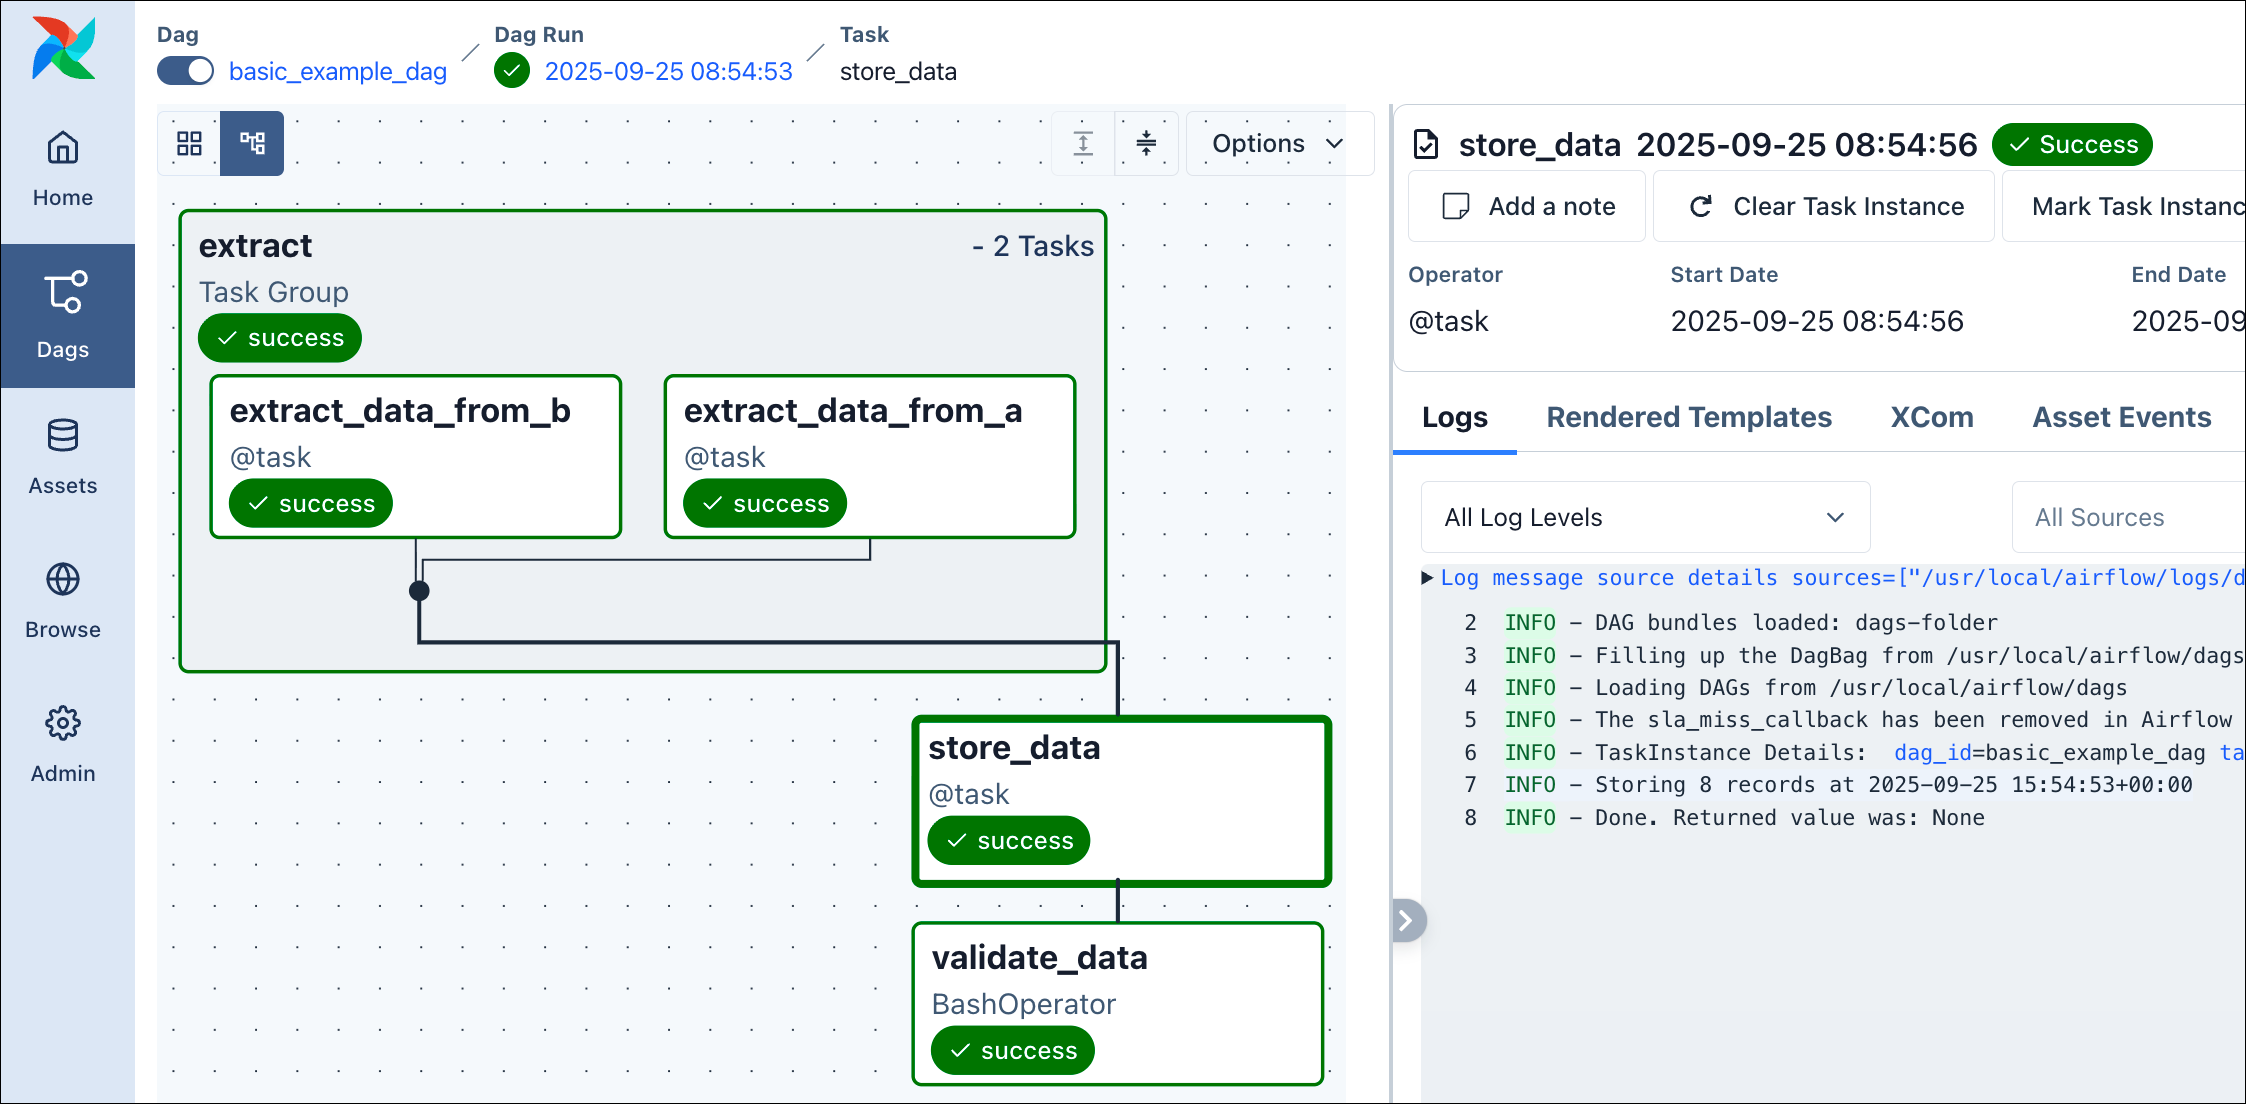 With this, you already know the basics of how to orchestrate a dag with YAML, including using task groups, passing data between tasks, using the TaskFlow API and classic operators, and setting basic dag attributes like the schedule or tags.
 This is a great starting point, and the following steps will cover more advanced features to prepare your DAG Factory knowledge for real-world use cases.
(Optional) Step 6: Asset-Aware Scheduling with YAML
Now, let’s explore one of Airflow’s most powerful features, asset-aware scheduling, and how to implement it using DAG Factory. We will create two dags: a producer that updates an asset, and a consumer that runs whenever that asset is updated. First, let’s create the Python functions that our tasks will execute. These functions will fetch data from an API, save it to a file, and then read it back. Create a new file namedinclude/tasks/asset_example_tasks.py with the following content:
`include/tasks/asset_example_tasks.py`
`include/tasks/asset_example_tasks.py`
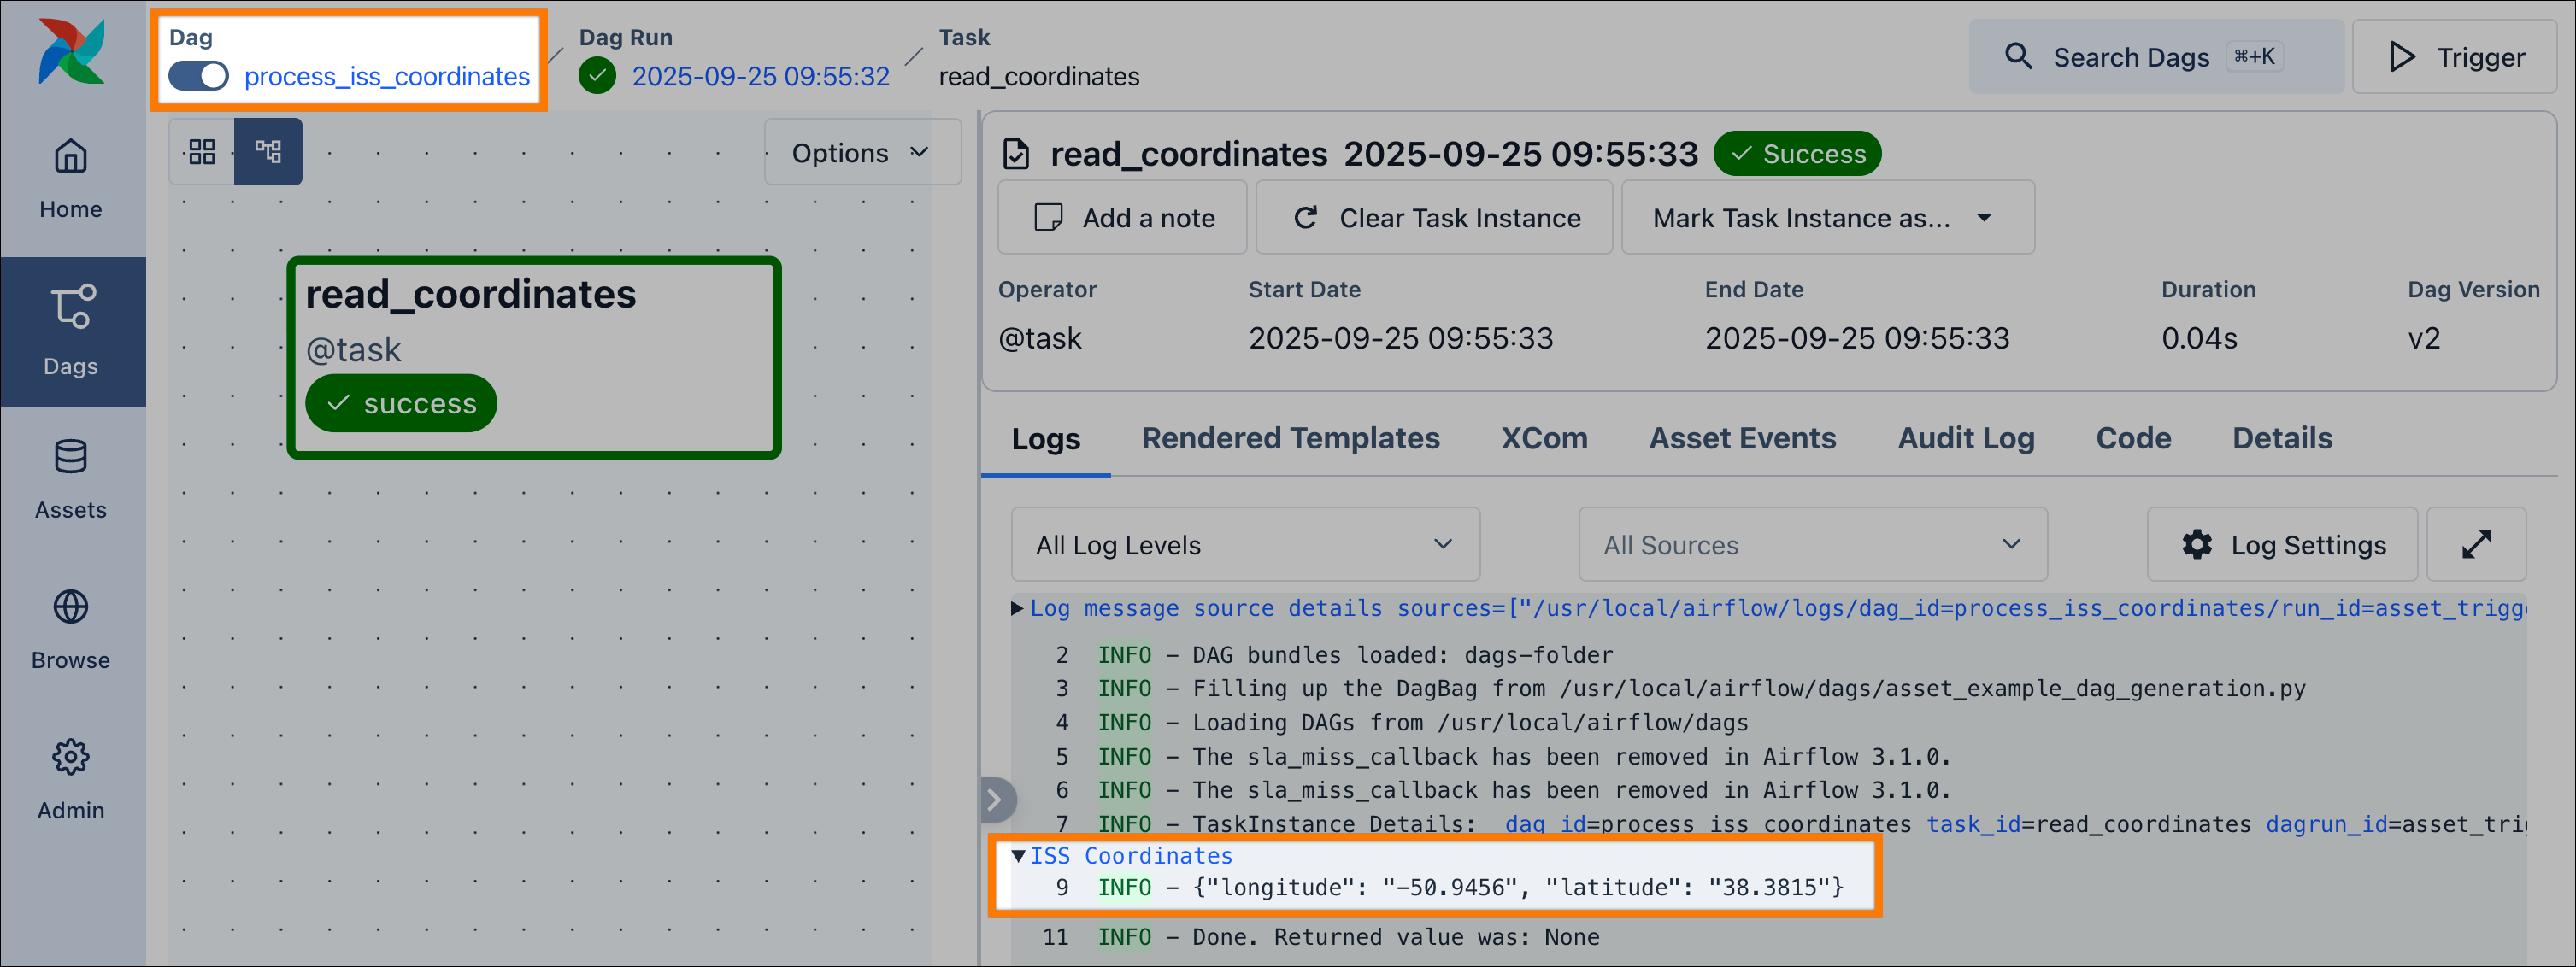
_update_iss_coordinates function retrieves data from an API and writes it to a file, while _read_iss_coordinates reads this file and prints the content to a dedicated log group.
Now that we have our Python logic, we can define the two dags that will orchestrate it. Create a new YAML file at dags/asset_example.yml:
update_iss_coordinates (producer) and process_iss_coordinates (consumer) dags. For the producing dag we define an outlet of type airflow.sdk.Asset and name it iss_coordinates. The consuming dag then uses this same asset identifier for its schedule attribute, which creates the dependency.
Also, take note of the YAML top-level default block. This configuration affects all the dags defined in the YAML file, allowing you to share standard settings and configurations, for improved consistency, maintainability and simplicity.
Finally, to generate these dags in Airflow, we need to create a corresponding generator script. Create a new file named dags/asset_example_dag_generation.py with the following content:
`dags/asset_example_dag_generation.py`
`dags/asset_example_dag_generation.py`
iss_coordinates asset. When you run the update_iss_coordinates dag, the process_iss_coordinates dag will be triggered automatically upon its completion.
(Optional) Step 7: Alternative YAML Loading
In the previous steps, we used a dedicated Python dag generation script for each dag to parse the YAML with DAG Factory. This is a useful approach for maximum control over the generation process, and to avoid any unexpected workload when teams work with many YAML files. However, it also adds complexity. Theload_yaml_dags function therefore also supports a more pragmatic way, to parse all YAML files in your dags folder recursively. To illustrate this, delete the two generator scripts dags/basic_example_dag_generation.py and dags/asset_example_dag_generation.py. Then create a new file dags/dag_generation.py:
(Optional) Step 8: Configuration and inheritance
As you create more dags, you’ll want to avoid repeating the same configuration. DAG Factory includes powerful features for centralized configuration and inheritance to help you keep your dag definitions clean, consistent, and easy to maintain across your project. This feature allows you to set default values for both dag-level arguments (likeschedule) and task-level arguments (like retries via default_args).
In our dags/asset_example.yml file, you already discovered one way to configure dags in a centralized way within the YAML definition:
update_iss_coordinates and process_iss_coordinates, will use the start_date from the default block. This feature becomes even more powerful, when using global defaults in combination with inheritance.
To illustrate this, let’s imagine a real-world scenario with a set of company-wide data pipeline standards:
- All dags should have a default
start_dateof2025-09-01. - All dags should be owned by
astronomer, unless they belong to a specific department. - All tasks should have 2 retries by default.
- The default schedule for all dags should be daily at midnight (
@daily), unless specified otherwise.
defaults.yml in your dags folder and applies its configuration to all dags within that folder and its subfolders. This creates a single source of truth for your global defaults.
load_yaml_dags uses the same default path for both the configurations and the YAML files: the path set as dags_folder. You can override only the path where DAG Factory looks for configurations, by setting the defaults_config_path parameter.dags/defaults.yml with the following content:
defaults.yml files hierarchically. A defaults.yml in a subfolder will inherit from its parent and can override any of the parent’s settings.
Let’s apply this to our scenario. We want to override the default owner for our Marketing and Finance departments, and also change the default schedule just for the Marketing department, to run dags at 1 AM rather than midnight for this department.
First, let’s create the folder structure:
dags/marketing/defaults.yml to set a new schedule and owner:
dags/finance/defaults.yml to override only the owner:
dags/marketing/marketing_dag.yml:
dags/finance/finance_dag.yml:
start_date, owner, or retries because they are all handled by our layered defaults.yml files. This allows you to write minimal dag configurations while maintaining centralized control over your project’s standards.
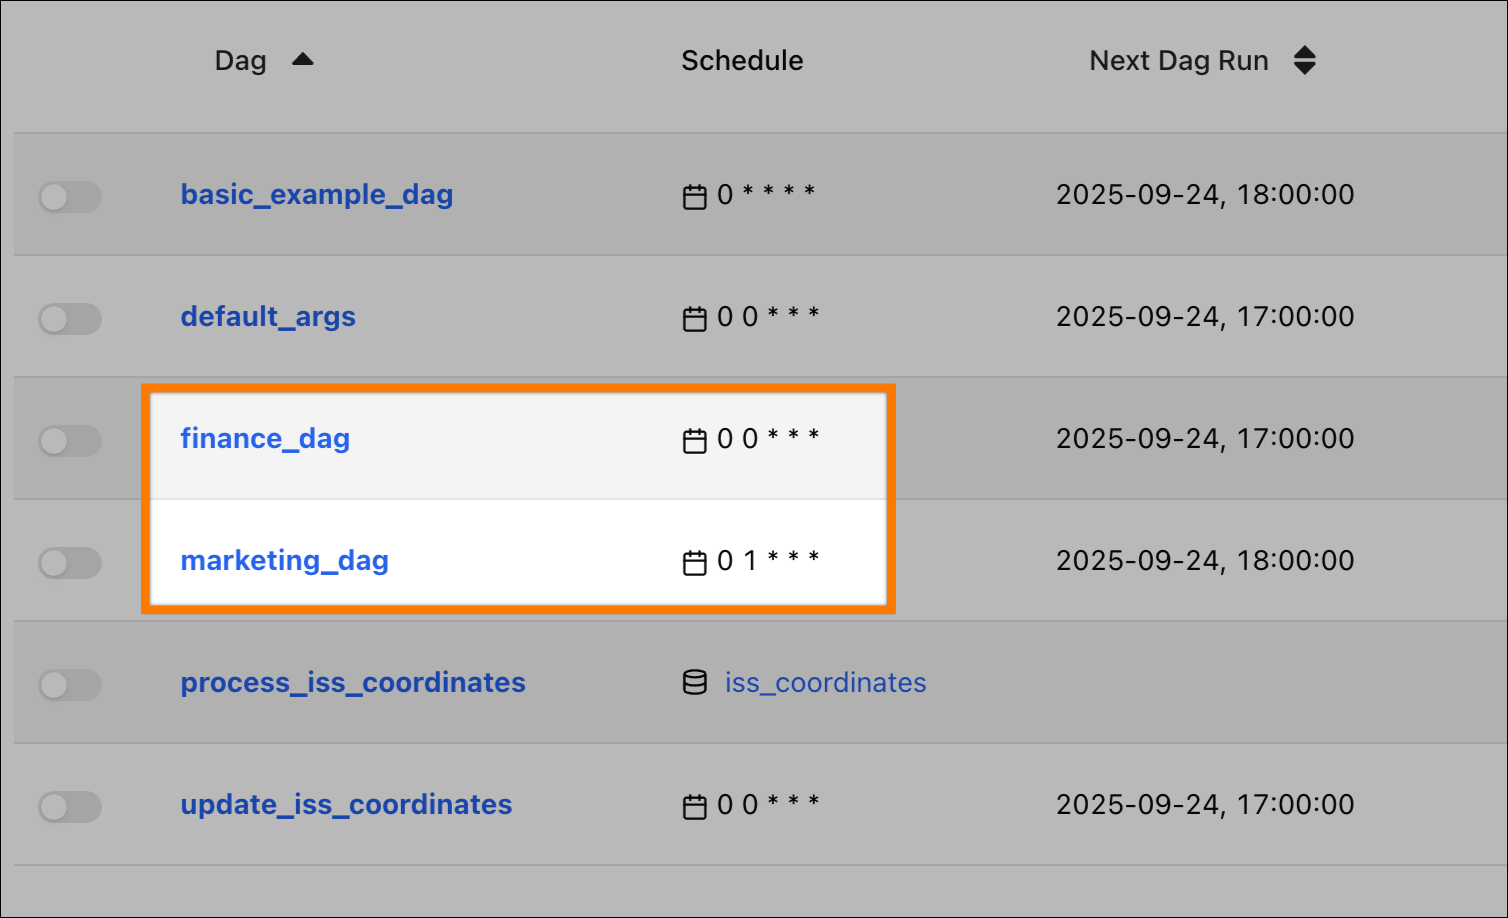
In the Airflow UI, you will see two new dags, each with a different set of inherited properties:
marketing_dag: Inherits theschedule(0 1 * * *) andowner(astronomer-marketing) from its localdefaults.yml, andretriesfrom the globaldefaults.yml.finance_dag: Inherits theowner(astronomer-finance) from its localdefaults.yml, and both theschedule(@daily) andretriesfrom the globaldefaults.yml.
If any
defaults.yml files are inside your dag_folder, DAG Factory might try to parse them as dags, which can cause errors in your task logs. To prevent this, keep dags_folder and defaults_config_path separate. Configuration inheritance still works as expected, and these errors are non-critical.Advanced usage: Dynamic task mapping
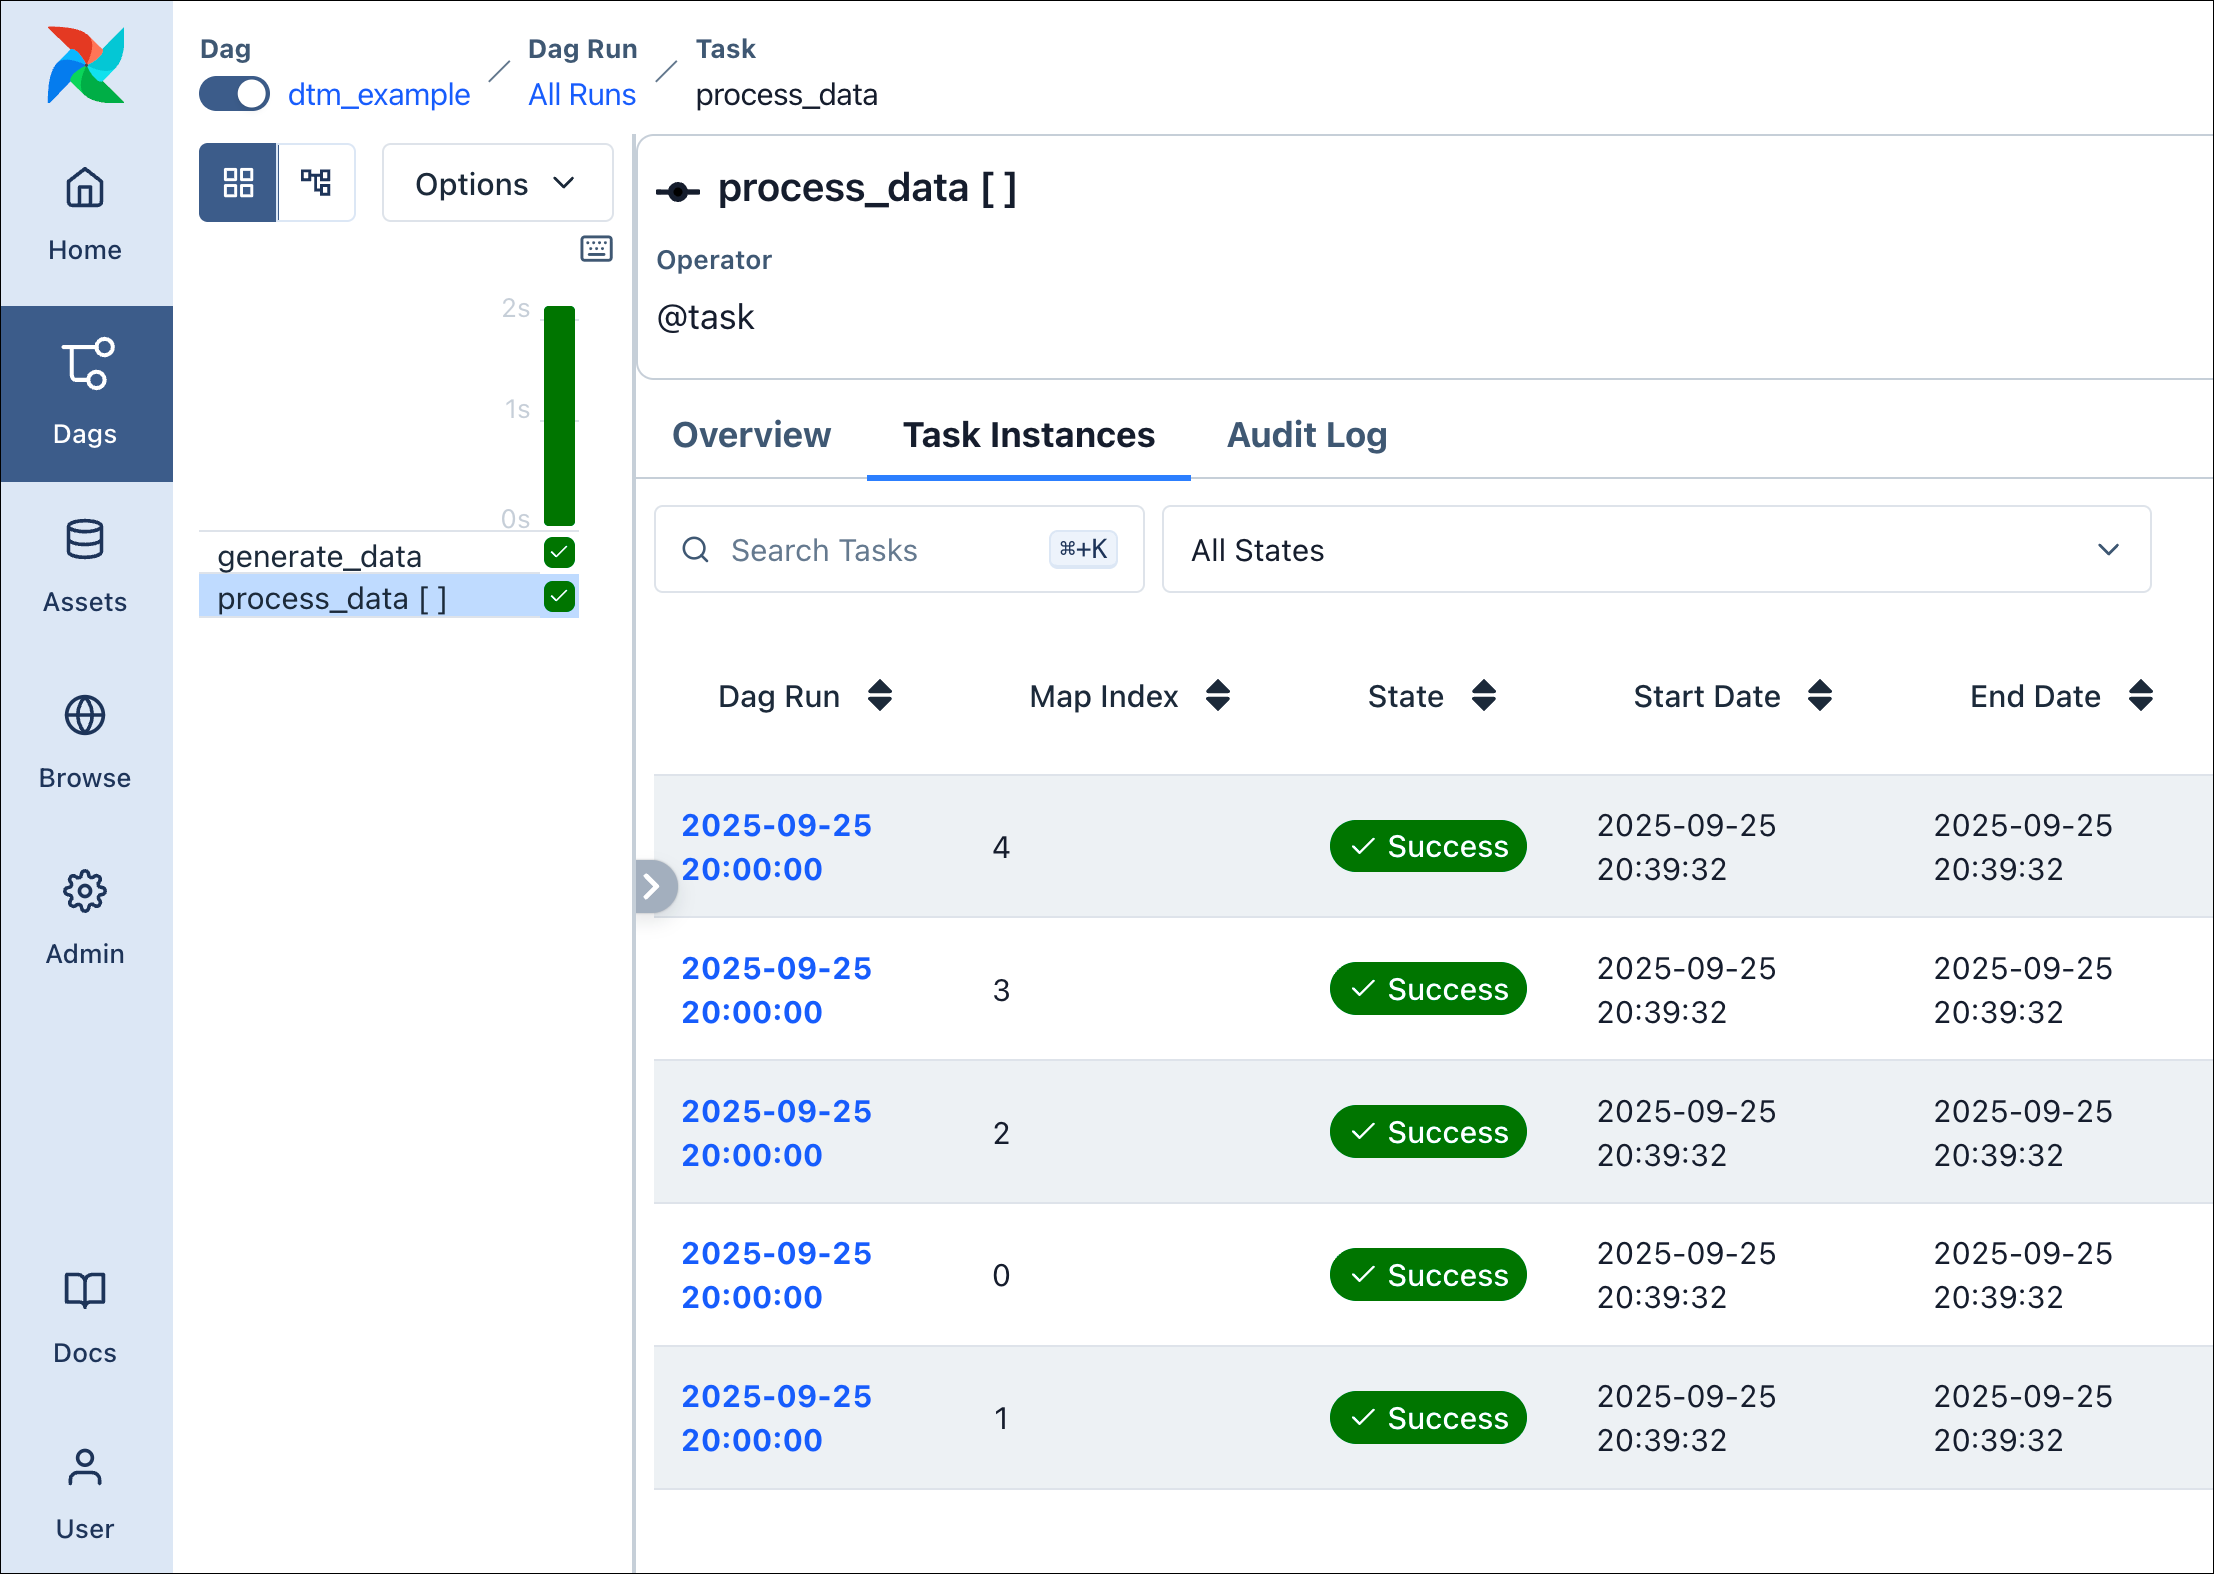
DAG Factory also supports dynamic task mapping, to dynamically generate parallel tasks at runtime. The following example shows how to apply this principle using the TaskFlow API. Let’s assume we have the following Python functions defined ininclude/tasks/dtm_tasks.py:
partial and expand in our YAML, to let DAG Factory apply dynamic task mapping:
generate_data to generate parallel task instances.
Advanced usage: Dynamic YAML generation
The examples above show how to use DAG Factory to create dags based on static YAML files. For use cases where you’d like to create several dags with a similar structure it is possible to create them dynamically based on a template YAML file to avoid code duplication. Creating a dag dynamically with DAG Factory simply means that you use Python code to create the YAML configurations instead of writing them manually. There are two files that you need:- A template YAML file that contains the structure of the dags you want to create with placeholders for the values that will change.
- A Python script that creates DAG Factory YAML file by replacing the placeholders in the template YAML file with the actual values.
include/template.yml:
`include/template.yml`
`include/template.yml`
dags directory. Place this script in the top-level of your project for now. You can run this script manually to generate your dags for local development or automatically as part of your CI/CD pipeline.
`generate_yaml.py`
`generate_yaml.py`
dags/dynamic_dags.yml file:
`dags/dynamic_dags.yml`
`dags/dynamic_dags.yml`
Conclusion
In this tutorial, you’ve journeyed from defining a single dag in a YAML file to building a complete framework for dynamically generating your pipelines. You’ve learned how to:- Define dags, tasks, and task groups using a simple, declarative syntax.
- Pass data between tasks and use the TaskFlow API.
- Implement Airflow features like asset-aware scheduling and dynamic task mapping.
- Manage configuration at scale using hierarchical
defaults.ymlfiles for inheritance. - Dynamically generate your YAML configurations using a templating engine.